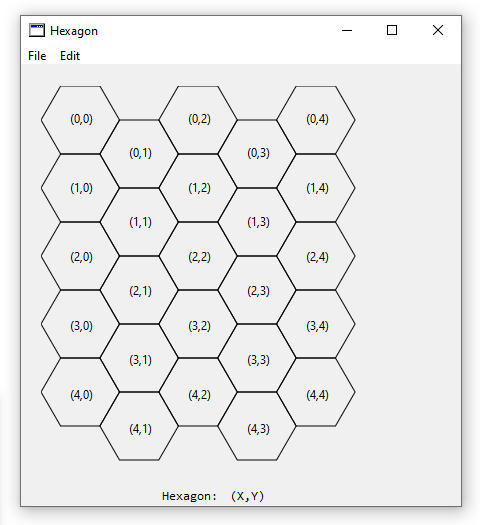
This article is an adaptation of C# code to Xojo code and the C# article was originally written by Rod Stephens at Draw a hexagonalgrid in C#. Rows and columns are numbered in a hexagonal grid when the rows start at zero at the top, and increase as you go near the bottom. Columns start at zero at the left and the value increases as you move to the right. Below is a screen grab of the hexagonal grid.
Figure 1. Hexagonal Grid Layout

This example needs to be able to do four things:
- Map a row and column to the points that are created for the hexagon
- Map a mouse-selected-point (x,y) to a row and column
- Colour the selected hexagon
- Show the row and column in the appropriate hexagon
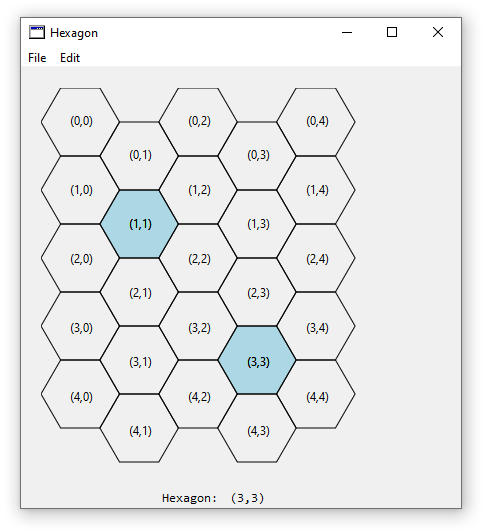
Figure 2. Selected Hexagon

Selecting hexagons will create a blue colour in the hexagon and the hexagon coordinate number will be redrawn in a black colour. Each time a hexagon is selected, it is added to an array of selected coordinates and is stored in the SelectPoints array.
A new project is created and a 400x400 canvas is added to the window. Two labels are placed below the canvas to show the hexagon that was selected. There are two global integer properties added: HexHeight, and SelectPoints. HexHeight is the height of the hexagon in pixels, and SelectPoints is the array of the selected points of the hexagon when the user clicks with the mouse.
Drawing occurs in the Paint event of the canvas.
|
Sub Paint(g As Graphics, areas() As REALbasic.Rect) Handles Paint //Height of the hexagon HexHeight = 68
Dim x, y as Integer //Draw Blue selected hexagons Dim MySelectPoints() as Double For x = 0 to SelectPoints.Ubound Step 2 MySelectPoints = HexToPoints(HexHeight, SelectPoints(x), SelectPoints(x+1)) g.ForeColor = RGB(173, 216, 230) //Light Blue g.FillPolygon(MySelectPoints) g.ForeColor = RGB(0, 0, 0) //Black DrawCoordinates(g, HexHeight, SelectPoints(x), SelectPoints(x+1)) Next x
//Draw black unselected hexagons Dim points() As Double For x = 0 to 4 For y = 0 to 4 points = HexToPoints(HexHeight,x,y) g.ForeColor = RGB(0, 0, 0) //Black g.DrawPolygon(points) DrawCoordinates(g, HexHeight, x, y) Next y Next x End Sub |
The height of the hexagon will be 68 pixels, and the selected hexagons are first drawn in a light blue colour.
A method called HexToPoints takes a row and column coordinate and converts it to six-points of a hexagon. These six points are used to draw the hexagon.
|
Public Function HexToPoints(height As double, row As Double, col As double) as double() // Start with the leftmost corner of the upper left hexagon. Dim width as double = HexWidth(height) Dim y as double = height/2 Dim x as double = 0
// Move down the required number of rows. y = y + row * height
// If the column is odd, move down half a hex more. If (col mod 2) = 1 then y = y + height /2 End if
// Move over for the column number. x = x + col * (width * 0.75)
Dim pointF() as double pointF.Append 0 //1-based array pointF.Append x pointF.Append y
pointF.Append (x + width * 0.25) pointF.Append (y - height / 2)
pointF.Append (x + width * 0.75) pointF.Append (y - height / 2)
pointF.Append (x + width) pointF.Append y
pointF.Append (x + width * 0.75) pointF.Append (y + height / 2)
pointF.Append (x + width * 0.25) pointF.Append (y + height / 2)
Return PointF End Function |
Code first calls the HexWidth method to determine the width of the hexagon.
|
Public Function HexWidth(height as double) as double //Return the width of the hexagon return (4 * (height/2/Sqrt(3))) End Function |
Trigonometry is used to determine the 30-60-90 degree triangle. The hexagon is four times as wide as the triangle and the total width for the triangle is (4 * (height/2/Sqrt(3))). Knowing the hexagons width, the HexToPoints method calculates the left vertex of the hexagon. The Y-coordinate is half the height plus the height times the row number. If the column is an odd number then the hexagon is moved down the y-axis by half of the height. The X-coordinate is 0 plus 0.75 of the hexagons width.
The For-Next loop in the Paint method has a step-2 meaning that it jumps every second value so that the selected hexagons are calculated in pairs of an x and y coordinate. Colour is changed to a light blue and a filled polygon is drawn. Black is the changed colour that is used when drawing the coordinates of the hexagon.
|
Public Sub DrawCoordinates(g as graphics, Height as Double, row as Integer, col as Integer) //Create the text to be written Dim MyCoord as String = "(" + row.ToText + "," + col.ToText + ")"
//Calculate coordinates and centre text Dim Width as double = HexWidth(Height) Dim Centre as Double = MyCoord.Len*2 Dim X1 as Double = col * (Width * 0.75) + width/2-Centre Dim Y1 as Double = row + Width/2-2 //(-2 is half the text height)
// Move down the required number of rows. Y1 = Y1 + row * Height
// If the column is odd, move down half a hex more. if (col mod 2) = 1 then Y1 = Y1 + Height /2 end if
//Draw the text g.DrawString(MyCoord, X1, Y1) End Sub |
Text to be written in each hexagon is created from the row and column to be drawn, and the width of the text, centre of the text, and calculated x and y drawing coordinates are determined. A DrawString command is used to draw the x and y coordinates inside the centre of the hexagon.
The bottom section of Paint code is drawing of the black-unselected hexagons, and two For-Next loops are created to draw 5 hexagons in the x-axis and y-axis direction.
Selection of the hexagon begins in the Canvas MouseDown event.
|
Dim row, col as Integer PointToHex(X, Y, HexHeight, row, col) LblHexagon.Text = "(" + row.ToText + "," + col.ToText + ")" me.Invalidate |
PointToHex is the method which maps a point on the Canvas to a hexagons row and column.
|
Public Sub PointToHex(X as Double, Y as Double, Height as Double, ByRef Row as Integer, ByRef Col as Integer) // Find the test rectangle containing the point Dim Width as double = HexWidth(Height) Col = (X / (Width * 0.75))
If (Col mod 2 = 0) Then Row = (Y / Height) Else Row = ((Y - Height / 2) / height) End If // Find the test area Dim testx as Double = Col * Width * 0.75 Dim testy as Double = row * Height If (Col mod 2 = 1) Then testy = testy + (Height / 2) End If // See if the point is above or // below the test hexagon on the left Dim is_above as Boolean = false Dim is_below as Boolean = false Dim dx as Double = x - testx if (dx < Width / 4) Then Dim dy as Double = y - (testy + height / 2) If (dx < 0.001) Then // The point is on the left edge of the test rectangle If (dy < 0) Then is_above = true End If If (dy > 0) Then is_below = true End If Elseif (dy < 0) Then // See if the point is above the test hexagon If (-dy / dx > Sqrt(3)) Then is_above = true End If else // See if the point is below the test hexagon If ((dy / dx) > Sqrt(3)) Then is_below = true End If End If End If
// Adjust the row and column if necessary If (is_above) Then If (col Mod 2 = 0) Then row=row-1 End If col=col-1
ElseIf (is_below) Then If (col mod 2 = 1) Then row=row+1 End If col=col-1 End If //Add to selected hexagons SelectPoints.Append(row) SelectPoints.Append(col) End Sub |
This method doesn’t need to worry about upside down triangles and does need to work with odd- and even-numbered columns.
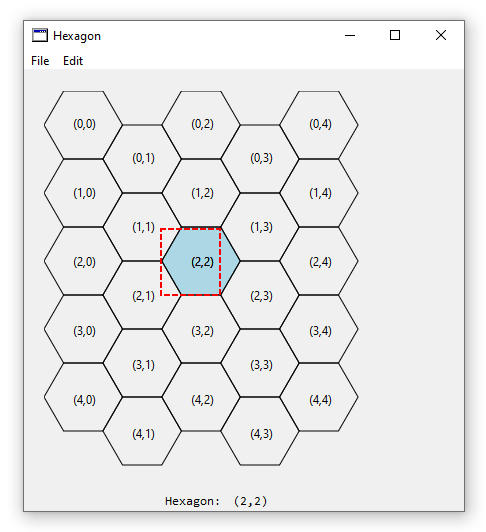
Figure 3. Hexagon Box

The selected row and column are calculated and if the point lies to the left-part of the rectangle then it may be above or below the selected hexagon. This program performs some of the calculations to determine if the point is located above or below the hexagon and updates the row and column if needed. An invalidate call causes the canvas to be redrawn with the selected hexagon, redraws the hexagon location, and also redraws the black outline of unselected hexagons.
The complete Xojo program can be downloaded Github Hexagon Grid Xojo
|
This example was created on Windows 10 with Xojo 2019 r1.1 on 23 June 2019 |

